|
Arduino ile bilgisayar arasında iletişim kurmanın en kolay yolu seri porttan haberleşmedir. Bu uygulamada ortamın aydınlık olup olmamasını sağlamak için kullanılan LDR elemanından elde edilen değeri web uygulamasında göstermeye çalışacağız. Arduino devremiz aşağıdaki gibi olacaktır.
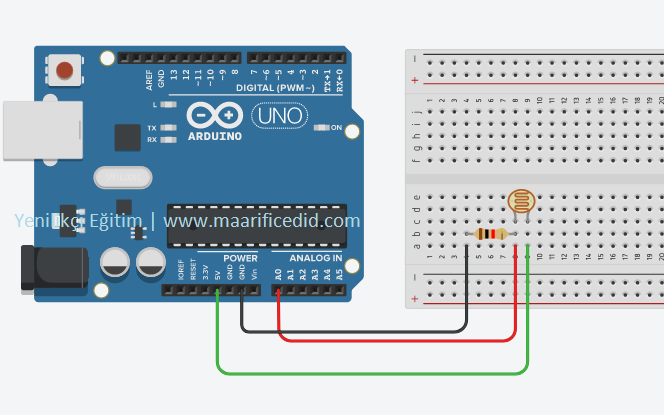
Bu devreye ait kodlar aşağıdaki gibi olsun.
int pin = 0;
void setup()
{
Serial.begin(9600);
}
void loop()
{
int value = analogRead(pin);
Serial.println(value);
delay(1000);
}
Şimdi web uygulamasını yapmaya geçelim. Web sayfasına 2 adet label, 3 adet button, 2 adet textbox ekleyin. Birinci textbox nesnesini multiline yapın. Web sayfasının body kısmı aşağıdaki gibi olacaktır.
<body>
<form id="form1" runat="server">
<div id="form">
<div id="sol">
<span>Değer</span><br />
<asp:TextBox ID="TextBox1" runat="server" TextMode="MultiLine" Font-Size="14px"></asp:TextBox>
</div>
<div id="sag">
<div class="bol" style="margin-top:25px;">
<asp:Label ID="Label1" runat="server" Text="Port : " style="margin-left: 0px; font-size:16px;"></asp:Label>
<asp:TextBox ID="TextBox2" runat="server" Width="57px" style="margin-right: 10px; font-size:16px;">COM3</asp:TextBox>
</div>
<div class="bol"></div>
<div class="bol">
<asp:Button ID="Button1" runat="server" Text="Bağlan" style="margin-right: 10px; font-size:16px;" Width="125px" />
</div>
<div class="bol">
<asp:Button ID="Button2" runat="server" Text="Bağlantıyı Kes" style="margin-right: 10px; font-size:16px;" Width="125px"/>
</div>
<div class="bol">
<asp:Button ID="Button3" runat="server" Text="Kaydet" style="margin-right: 10px; font-size:16px;" Width="125px" />
</div>
</div>
</div>
</form>
</body>
Css kısmı ise aşağıdaki gibi olmalıdır.
<style>
#form {
width: 500px;
height: 400px;
border:2px solid blue;
}
#sol {
margin:5px 5px;
width: 55%;
height: 100%;
float:left;
}
#sag {
width: 40%;
height: 100%;
float:right;
}
#TextBox1 {
width: 100%;
height: 90%;
}
.bol{
height:20%;
text-align:right;
}
</style>
Sıra geldi kodların yazıldğı cs dosyasına. Burada yer alan kodların tamamı aşağıdaki gibidir.
using System;
using System.IO;
using System.IO.Ports;
namespace WebApplication3
{
public partial class WebForm1 : System.Web.UI.Page
{
private SerialPort myports;
private DateTime tarih;
private string veri;
protected void Page_Load(object sender, EventArgs e)
{
}
protected void Button1_Click(object sender, EventArgs e)
{
myports = new SerialPort();
myports.BaudRate = 9600;
myports.PortName = TextBox2.Text;
myports.Parity = Parity.None;
myports.DataBits = 8;
myports.StopBits = StopBits.One;
myports.DataReceived += new SerialDataReceivedEventHandler(Myports_DataReceived);
try
{
myports.Open();
TextBox1.Text = "";
}
catch (Exception ex)
{
Response.Write(ex.Message);
}
}
private void Myports_DataReceived(object sender, SerialDataReceivedEventArgs e)
{
SerialPort sp = (SerialPort)sender;
veri = sp.ReadExisting();
tarih = DateTime.Now;
string saat = tarih.Hour + ":" + tarih.Minute + ":" + tarih.Second;
TextBox1.Text += saat + "\t\t\t" + veri + "\n";
}
protected void Button2_Click(object sender, EventArgs e)
{
try
{
myports.Close();
}
catch (Exception ex)
{
Response.Write(ex.Message);
}
}
protected void Button3_Click(object sender, EventArgs e)
{
try
{
string pathfile = @"D:\";
string file = "dosya.txt";
File.WriteAllText(pathfile + file, TextBox1.Text);
Response.Write("Dosya " + pathfile + " kaydedildi");
}
catch (Exception ex)
{
Response.Write(ex.Message);
}
}
}
}
Projeyi kaydedip çalıştıralım. Arduino devresinden gelen değerler metin kutusunda görüntülenecektir.
|